Chevy Cavalier Fuel Pump
The Chevy Cavalier fuel pump problem remains a common occurrence on this popular entry level automobile.
In fact, fuel pump failure is so common in the Cavalier, Chevrolet Cobalt and Pontiac Sunfire that people rush into the repairs without confirming the root cause of the problem.
In some cases I see people talking about replacing the fuel pump on a Cavalier and asking for further assistance about why this didn't solve the stalling and hard starting issue.
On more than one occasion I've found a completely plugged fuel filter on a Sunfire, Cobalt or Cavalier that recently had a fuel pump go out.
New Parts : Fuel Pump FP3507M for 00-05 Chevy Cavalier & Pontiac Grand AM/Sunfire.
Premium Fuel Filter Fits Chevrolet Cavalier and Cobalt 2.2L 2000-2010
In some scenarios when the fuel pump self-destructs internally it creates little pieces of rubber and plastic debris.
What's left of the pump pushes these pieces into the fuel filter. Although these fuel filters are of the easy to replace canister type variety, car owners often forget about them.
General Motors says you should replace these fuel filters every 30,000 miles. I've seen original equipment, fuel filters, as indicated by a purple dot installed from the factory, with more than 100K miles on it.
A clogged gas filter can take out an aging electric pump. Furthermore, in the old days we would never replace any fuel pump without replacing the filter.

Unfortunately, things in the automotive business change and not everybody see's things the way we use to. Therefore, it’s not unheard of for even professional mechanics to replace a fuel pump without addressing this maintenance item.
In my opinion, this remains the number one cause of repeat failures when replacing the gas tank fuel module assembly.If we force the new impeller to push against a clogged fuel filter it greatly reduces the lifespan of the replacement parts.
In this brief article we'll talk about how to get the diagnosis right when you think you have a Chevy Cavalier fuel pump problem.
In addition, we'll talk about some of the replacement parts that are temptingly inexpensive. And finally we'll talk about the replacement procedure of the fuel pump itself.
How to Diagnose Fuel Pump Problems
When people ask me how to diagnose fuel pump problems they're often immediately disappointed with my answer.
To answer the question of how can I verify the fuel pump has failed is to test it. This means energizing the unit and reading the pressure output created by the spinning impeller inside of it.
Do-it-yourself minded car mechanics don't like when the first step of diagnosis includes the purchase of a necessary tool they don't currently have in stock.
The good news is that a specialized fuel pressure gauge that uses a quick connect Schrader valve fitting remains available for purchase in the $40 range.
Here's the beautiful part about connecting this test gauge to the fuel rail and cycling on the ignition key. Not only do you get to see if the pump is running, but you also get to see the output pressure.
If your test gauge shows any pressure at all, that means the entire electrical side of the fuel pressure circuit remains fully operational.
In other words, by cycling the key you just tested the energize or command signal from the computer, the fuel pump relay and all of the wiring up until the in tank module.
Quick sidebar: if the pressure reads zero, then you should test for power and ground at the four wire connector.
If you can hear the motor running or can verify proper electrical operation then the fuel pressure test of zero speaks volumes about your next step in diagnosis.
However, before we drop the gas tank and further investigate the pump, it's time to locate the fuel filter. Unfortunately, on an entry level car like the Chevy Cavalier a fuel filter is often ignored.
I've written an article about how to diagnose a clogged fuel filter. With that said, a completely clogged filter can also damage the fuel pump assembly. When we tell the pump to build pressure and push against a blockage, it can physically ruin the delicate impeller run by the electric motor.
If we find a clogged fuel filter it's time to replace that tune-up and maintenance part and then retest the fuel pressure. The fuel pressure reading on a Chevy Cavalier from the model year 2000 through 2005 should register above 55 psi.
Chevrolet Fuel Pump Replacement Parts
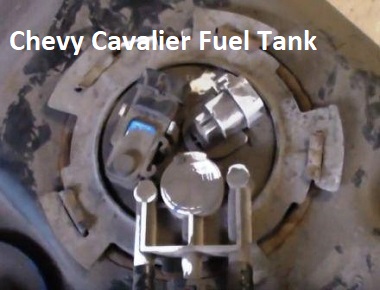
 Chevy Cavalier Fuel Tank Removal
Replacement of the in tank module assembly that contains the electric pump remains a common procedure for many different years, makes and models.
The surprising part about the repairs becomes the amazing difference in the cost of the replacement parts. I understand that auto parts cost more at the dealership, but in the fuel pump category I see large discrepancies.
In most cases a Chevrolet parts department charges cost +30% on individual auto parts. However, if I call a dealership for a replacement gas tank module I certainly pay more than that.
One of my replacement tips is to use a quality replacement part. This is easier said than done. I've taken a chance on different aftermarket brands and to this date we've been lucky. There's another important thing to mention about replacement parts.
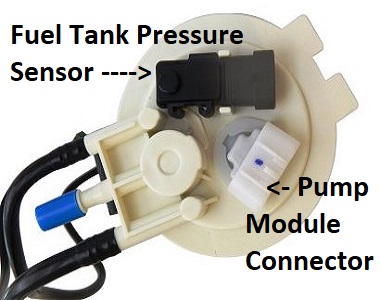
This specifically applies to the Chevy Cavalier Pontiac Sunfire, Grand Am and Chevrolet Cobalt models. Most of the aftermarket replacement Chevy Cavalier fuel pump modules include a brand-new fuel tank pressure sensor.
Failure of the General Motors fuel tank pressure sensor becomes yet another common issue with their sedan and coupe models.
Chevy Cavalier Fuel Pump Installation
Pulling the fuel pump out of any car is never a fun job. However, if you had to do this operation for the first time, the Pontiac Sunfire, Chevy Cavalier and Cobalt make a good subject vehicle for your first attempt.
With that said, often the biggest obstacle facing DIYers remains the amount of fuel in the tank. The more gas you get out, the easier this job will be.
Taking extra time to find a safe way to siphon out the gasoline that's best for you becomes time well spent. In fact, I never tried to remove the gas tank in my driveway unless that fuel reading comes in at well below a quarter tank.
These plastic gas tanks are extremely lightweight with no fuel in them and the job to replace the in tank module assembly becomes much easier when you don’t have to deal with fuel sloshing around.
The next step in our operation is to give the fuel tank strap retaining bolts a good soaking in a penetrating oil product like liquid wrench.
They make the gas tank straps using stainless steel and they galvanize the retaining bolts.
With that said, this hardware enjoys exposure to harsh conditions and it’s often difficult to remove these bolts without powered tools.
After unhooking the three fuel lines and the large diameter fuel filler hose you can use a floor jack to lower the gas tank to the ground.
At this point you want to find some compressed air or even a broom and completely, clean and dust the top of the tank before replacing the fuel pump module.
Do your best to keep new dirt from entering the gas tank. And while you’re at it inspect the remaining fuel for signs of contamination or debris.
Here's an important note about the old sending unit that's mounted in the gas tank. They spring load the sending unit to hold the pickup screen against the bottom of the gas tank.
This means when you remove the lock ring that the sending unit jumps up at you. In order to compensate this and stop fuel from spilling, push down on the center of the old sending unit as you release the lock ring.
Another important note before you put everything back together. The replacement Chevy Cavalier fuel pump kit often comes with a new four wire electrical connector. Chevrolet decided that the square style connector they originally fit on the automobile allowed corrosion to enter the connection.
Therefore, they have replaced this with a new style flat, four wires, weather pack connector that does a better job of protecting the electrical connection.
This is not an area of the automobile you want to use a crimp style connector. Therefore, it’s recommended to solder on the new pigtail connector and use heat shrink protection over the wire repair. Of course you want to do any soldering and heat shrinking far away from the open gas tank.
If you drive a Chevrolet Cavalier, Pontiac Sunfire or Cobalt you'll want to read this article about how to fix the clicking sound in the dash without replacing parts. Visit our Homepage to see what else we cover here.
Author bio : Mark is a retired ASE certified master technician, Chevrolet Professional Service Council member and the founder of FixMyOldRide.com. Watch the video on the about Mark the mechanic page to see his credentials. Mark hand writes all of the articles on FixMyOldRide.com unless indicated otherwise.