Problems With Fuel Tank Pressure Sensors
This article covers a boatload of General Motors cars and trucks. These automobiles will set a check engine light code in the P0440 range.
However, when the sensor itself causes a problem, P0452 or a P0453 set for the fuel tank pressure reads low or high respectively.
Unfortunately, if the seal fails where the sensor fits into the fuel tank it can also set evaporative emission system leak codes like P0442.
These Evap leak codes are often confused with vapor canister purge valve problems that I covered in a separate article. So lets learn how to test a fuel tank pressure sensor before we replace it.
First, let me deliver the good news. When this computer sensor fails it doesn’t change the way the vehicle runs.
It will however turn on the check engine light and cause you to fail a state emission inspection. This is a simple three wire circuit so we have that going for us as well.
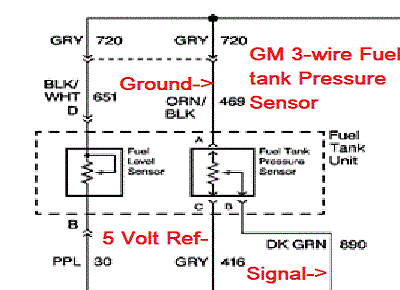
There's a 5 V reference voltage wire that comes from the ECM, a ground wire and a signal wire that returns a variable voltage back to the power train control module.
This simple setup makes diagnosis straightforward. The bad news is the components aren't easy to get at as they fit into the top of the fuel tank near the sending unit and hanger assembly that holds the fuel pump module inside the tank.
In this article we'll cover the basic operation, diagnosis of the problem and some tips for replacing the sensor and testing the circuit before you put things back together.
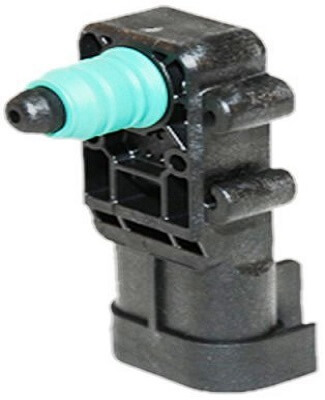
 GM Fuel Tank Pressure Sensor
Fuel Tank Pressure Sensors
As I discussed in other articles about the evaporative emission system, these codes set to notify drivers that fuel vapor might be leaking into the atmosphere.
The Environmental Protection Agency asked car manufacturers to perform tests to verify that the fuel system maintains a perfect seal at all times.
Manufacturers were forced to design inexpensive systems capable of taking thousands of tests over long periods of time. The little plastic parts put in charge often malfunction.
The tank pressure sensor has the final say in telling the computer if the tank pressure is holding during a key on pressure test.
If this sensor isn’t working correctly the computer gets false information and turns on the check engine light.
Although the pressure sensor is often the cause of a P0452 or P0453 there are other possible causes.
Breaks in the signal wire or the ground connection will also cause these two codes to set. So lets talk about verifying if this part needs replacing.
Testing the Gas Tank Pressure Sensor
Unless you have an automotive scan tool you're going to have to lower the tank to perform the tests to verify that the sensor itself has failed.
If you have an automotive scanner, you can pull up the pressure voltage on the scan tools data stream.
The voltage should never read zero or 5 V. Instead the reading should be somewhere in between those high and low points.
The voltage should also change when the engine is first started. If you do find a fixed voltage reading between zero and 5 V you most likely have a defective sensor.
If you don't have an automotive scanner you'll have to lower the tank and pull the connector off the pressure sensor and test it with a voltmeter.
If the voltage reading is either zero or five then it's possible that you have a wiring problem.
 Fuel tank pressure sensor wire diagram
When you disconnect the sensor the wire all the way to the right, which is gray with a black tracer on many models, is the 5 V reference coming in from the computer.
The orange wire with a black tracer all the way to the left supplies a constant ground. If both of these locations test good with the key in the run position, then you have a failed fuel tank pressure sensor.
However, you can take an additional step to verify this condition. Try plugging the connector back in and then back probe the center or green colored signal wire that sends information back to the computer.
I use a T shaped hat pin to back probe these ECM connectors. The results should be a varying voltage and not fixed at zero or five when the ignition key is cycled to the on position. Sidebar:
The diagnostic steps above cover the most common problems. However, in rare cases you could have a real fuel tank pressure problem.
A malfunctioning vent valve or a defective pump that supplies the pressure to the tank for the test can also fail.
These problems remain a rare situation when compared to how often the sensor itself fails or wiring problems occur.
With that said, there's
always an automobile out there waiting to throw you a curve-ball. For more information about automotive electrical testing, take a look at this article covering strategy based electrical diagnosis.
Tips for Replacing the Pressure Sensor
Before we get into the physical tips of lowering the gas tank let's talk about the replacement parts briefly.
On this page I offered links to two different sensors from two different companies with quite a price difference. The first couple of times I did these repairs I used the generic $9 vapor pressure sensor found on Amazon.
I never had a problem with them, but I see from the comments that sometimes these sensors didn't last long or they didn't work at all straight out-of-the-box.
When you compare this to the comments provided on the AC Delco fuel tank pressure sensor page I start to have more confidence in the General Motors Corp. part.
In the end it's up to you which one you get, but for right now I'm spending the extra bucks and going with the General Motors Corp. AC Delco component.
The main reason is because it's no fun lowering the gas tank down or taking it out altogether. This leads us to the next section which is how to deal with the fuel tank.
Chevrolet has its Share of Fuel Tank Issues
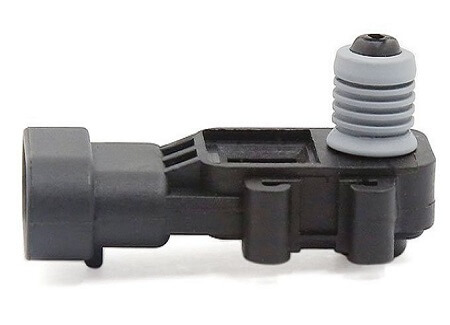
 Uxcell Fuel Tank Pressure Sensor
I’m getting tired of pulling the gas tank on Chevrolet and GMC trucks. I’m losing track of how many times I had to replace the electric fuel pump on a General Motors automobile.
But I digress. First, anytime you're dealing with a gas tank you want to run it as low on fuel as possible. If the vehicle has more than a quarter tank, take the time to transfer the fuel to another automobile.
Sidebar: Foreign car manufacturers put access hatches above the fuel tank sending unit area so that you can service these parts without removing the tank.
After years of General Motors watching them do this they still don't give us an access hatch. Therefore we will have to lower the tank, but we don't have to remove it for this job.
One of the things that stop it from coming down at all is the fuel tank filler hose. So it's recommended to remove that and the fuel tank straps that are held in by rusty 15 mm bolts.
You might want to use Kano Aerokroil penetrating oil to help you crank these out. You can support the tank with screw jack stands or a floor jack depending on your work area.
Once you gain some space between the tank and the floor pan, you can get in there with a long handled flat blade screwdriver and pry the old sensor off the retaining bracket.
This is not easy as it's the brackets responsibility to hold the sensor in place without retaining bolts. It takes some wiggling to get the old one off and the new one on.
Sidebar: When using the screwdriver method it’s possible to break the old sensor. When this happened to me I had to push the broken stem down inside the tank so I could install the new part.
This won’t cause any future problems because these pieces will float on the surface of the fuel and not down at the fuel pickup area. In addition, the pieces are too big to get past the fuel pump pickup sock.
Final Thoughts about Pressure Sensors
Although I am critical of General Motors and the cheap plastic parts they use on the evaporative emission system these parts did hold up for almost a decade and in some cases longer.
My complaints about the access hatches over the top of the fuel tank really applied to cars and sport utility vehicle applications.
On the pickup truck the tank is on the left side underneath the cargo bed. So an access hatch wouldn't work in that situation.
However, on a Chevrolet Tahoe or Suburban there’s an opportunity to put a nice access hatch right over these parts that we will need replacing if we plan on keeping these vehicles for 15 years or more.
Here@fixmyoldride.com we are big believers in keeping those old rides running. This way we can avoid car payments. It's hard to think about making car payments for seven years, but people do it.
Author bio : Mark is a retired ASE certified master technician, Chevrolet Professional Service Council member and the founder of FixMyOldRide.com. Watch the video on the about Mark the mechanic page to see his credentials. Mark hand writes all of the articles on FixMyOldRide.com unless indicated otherwise.