Chevy Steering Wheel Switches
In many cases, you'll find it necessary to replace the Chevy steering wheel switches on cars and trucks from the 2003 through the 2007 model year.
Despite General Motors installing these convenient control buttons for more than 30 years, they got themselves connected with a bad batch.
The style of switches they used from 2003 through 2009 didn't hold up as well as the buttons and switches used in the past and present.
With that said, it's really the way people use the switches and how often, that determines the longevity of the originally installed buttons and switches.
As an example, my significant other runs a 2005 GMC Envoy. These are the same switches I found necessary to replace in my 2004 Chevrolet Tahoe.
Her switches look like brand-new, because she’s concerned about breaking a nail when she pushes on these buttons. Me on the other hand, I am a button masher.
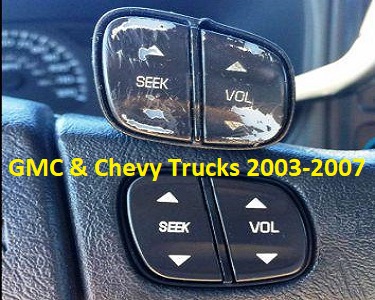
I'm not sure if it's the frustration from the workday or my powerful hands from being a mechanic, but I destroyed my buttons within a few years of heavy operation. You can see the image below as a reference for worn out radio control buttons
 Chevrolet Steering Wheel Buttons
Unfortunately, even the GMC Envoy needed to have the steering wheel switches replaced eventually because the LED back lights went out.
This doesn't sound like the end of the world, but once you get used to driving at night with the convenience of a backlit switch it's hard to live without it.
Even though you probably know from memory where the button is located and what they do, it's always nice to be able to glance down quickly and verify you’re in the right place pushing on the right button.
In this brief article we'll talk about replacing the switches and a few tricks that you can use to avoid frustration.
Whether the switch back light failed or the button no longer accomplishes the assigned task, this remains a relatively simple operation with a low parts cost.
Chevy Steering Wheel Radio Buttons
Problems with the Chevy steering wheel switches include intermittent operation and failure of the back-light. However, in some cases the black paint flakes off and the LED light becomes a distraction to the driver.
Of course it's the Chevy steering wheel radio buttons that often see the heaviest amount of usage. Therefore, it's no surprise that the radio switches for seek and volume remain the best selling replacement parts in this category.
With that said, the LED back-light is also a weakness in this generation of switches installed in millions of vehicles.
A newly installed switch has a slightly different shade of light. The factory installed buttons have a colored sleeve installed over the LED lamp.
Some people complain about this and others don't even notice it. Some customers say the newer button appears brighter even though it is powered by the same amount of voltage as the original equipment parts.
Unfortunately, a 10 year old LED light, even if it's the same part number, doesn't appear as bright as a brand-new replacement.
For this reason, if you have your flat blade trim tool out already, along with your needle nose pliers, you might want to knock out the replacement of both upper steering wheel switches at the same time.
Although the lower switches that control information and personal settings are also available I skip these.
Because
of their lack of use they seem to last much longer and if the LED
backlight goes out I don’t really care.
Replacing the Chevy steering wheel switches
 Steering Wheel Switch Removal
An overview of the procedure for replacing the Chevy steering wheel switches includes digging out the old parts.
These pods press into the pliable padded surface of the Chevrolet factory steering wheel. When I looked up the procedure in the factory service manual, they showed the removal of the airbag module and steering wheel assembly.
Fortunately, mechanics often find shortcuts to avoid these troublesome procedures. Maybe this is why the labor seems awful high for replacing the switches at a dealership service department.
These labor charges might include the removal of the airbag module and the steering wheel when this appears unnecessary.
Of course, if you already have the steering wheel off to replace the Chevrolet ignition switch then this becomes the perfect time to add the radio control buttons to your parts sourcing list.
Here's a video on how to remove the GM radio control buttons from the steering wheel. I picked this video for a couple of reasons.
First, the technician uses a plastic flat blade trim tool to pry up and remove the factory installed switch assembly.
This becomes a good idea, because it's easy to damage these aging steering wheels with a flat blade metal screwdriver.
The second reason I picked this video is you can see what it takes to replace the blown LED lamps.
Not only is it a pain in the neck, but it doesn't take care of any of the other issues like worn out switches or flaking black paint that comes off of the button surface. For these reasons I opt for a new replacement part instead of replacing the LED bulbs.
Finally, while installing the replacement switch try using a pair of needle nose to grasp the connector and small section of wiring that comes out of the steering wheel.
You need to make sure this connector is fully engaged. General Motors used a snap lock connector and you'll know when it is fully seated. Be careful with the connector and wiring as they are extremely light duty.
However, replacing the Chevy steering wheel switches makes for a great DIY auto repair. Find out what other simple automotive electrical repairs you can perform in the comfort of your own driveway. For more information about the fix my old ride website visit the homepage.
Author bio : Mark is a retired ASE certified master technician, Chevrolet Professional Service Council member and the founder of FixMyOldRide.com. Watch the video on the about Mark the mechanic page to see his credentials. Mark hand writes all of the articles on FixMyOldRide.com unless indicated otherwise.