GM Door Hinge Repair
The GM door hinge repair is needed on thousands of cars and trucks. Here we'll talk about what goes wrong and why you shouldn't avoid fixing it.
In addition, we'll cover a few tips that can help you get through the operation with a minimal amount of difficulty.
An interesting thing about the door hinge problem is the amount of vehicles affected by the issue. Vehicles from 1987 through the 2003 model year are likely to experience failure of the door hinge bushings.
Quick links: GM Door Hinge Pin Bushing Repair Kit with Spring, Includes Door Spring Tool.
The fascinating part about this is after 10 years General Motors improved the design. However, they still used the same pin and bushing set up. Therefore, the new design didn’t completely solve the problem.
Before we supply the tips and show you the GM door hinge repair kit let's talk about the problem. The average door on a General Motors car or truck weighs in at around 100 pounds.
All of this weight remains supported by the upper and lower door hinges. These heavy-duty hinges attach to reinforced areas of sheet metal using continuous bead welds on many models.
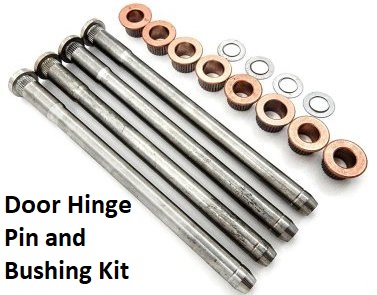
Unfortunately, all of this weight needs to swing up and back. They use steel hinge pins riding in brass bushings to facilitate this movement.
If you think about how often you open and close the driver side door, it won't surprise you to see what the brass bushings look like when the door starts the sag.
In most cases, the bushing wears away and then starts to fall apart. This is when the problem becomes impossible to live with. Let's move on and talk about why we shouldn't put this repair off for too long.
 Door Hinge Pin and Bushing Replacement
Fix the GM Door Hinge Now
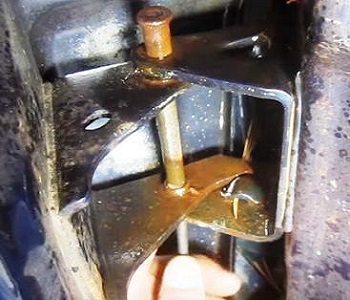
Take another look at the picture I supplied in the opening paragraph. As you can see the metal hinges on this Chevrolet truck are permanently welded to the door frame on both the car side and the door side.
General Motors does this on many years, makes and models, but not all. Some hinges remain replaceable. Regardless, they designed the brass bushing that rides against the pin to take all of the wear.
When this bushing deteriorates and falls apart, it leaves the pin to ride against the permanently mounted hinges. When you continue to put off the repair the steel pin starts working on the hinge.
Unfortunately, what happens is the hole that holds the bushing starts to become egg shaped with every open and closing of the door.
When this area becomes damaged enough, installing the easy to use bushing kit no longer becomes an option. In extreme cases you’ll have to replace the door hinge. Yes, the welded on door hinges can be replaced by a body shop.
When the hinge that's welded to the door becomes the issue, many people opt for a junkyard door replacement. However, when it's the hinge that's mounted to the automobile, then you have even bigger problems.
Now we need to cut that old hinge off and weld the new hinge on. I have seen this repair firsthand and it's not something that you want done to your automobile. Although there are many fine welders in this world, nobody lays down a factory bead weld like a General Motors robot.
You can avoid all these problems by jumping on the issue as soon as you detect play between the pin and the bushing. To diagnose a worn hinge pin bushing, you simply grab the edge of the door and pull up. Next you measure the amount of deflection or play. Long story short, there shouldn't be any.
DIY GM Door Hinge Repair
 GM Door Hinge Repair Kit
I'm on the fence about saying whether or not the GM door hinge repair makes a good DIY project. In the end, it really boils down to your personal skill level and experience of working on your own automobiles.
With that said, the main struggle of the repair is dealing with the weight of the door. Like most people, I use a floor jack to support the weight. I use a long block of wood to help support a larger area of the door.
In addition, I have a rubber pad that I place on top of the block of wood that protects the finish of the door. Nevertheless, I still like to have a second person around to steady the door when I take it loose from the automobile.
When I say take it loose I'm not talking about removing it completely. I'm just saying to slide it back slightly, so you can install the new bushing kit.
I recommend for the first time that you do the repairs to have an assistant to help steady the door. There are a few more things to remember when you perform this operation for the first time.
Before you Install the Hinge Repair Kit
Take a good look at things before you drive out the pins. Even better take a few pictures of what the hinge looks like before you start taking things apart.
The orientation of the hinge pins becomes important. They slide the pin down into the lower hinge and in the up direction for the top hinge.
The reason this becomes important is due to a thicker area near the head of these pins.
This means they put two different sized bushings in the repair kit. You need to put it together exactly the way you took it apart.
There's another big thing to consider. On General Motors cars and trucks from 1988 through 2003 they used two different designs of door checks.
A door check is that magical item that holds the door partially open so that you can comfortably get in and out of the automobile. The older models have a hard to deal with spring set up.

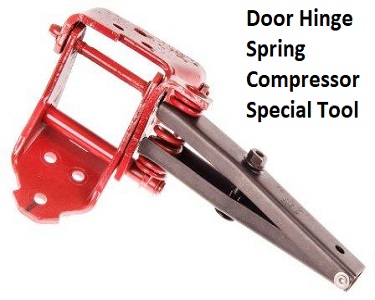
The newer models have a door check assembly that simply bolts to the door using two 10 mm screws. On the older vehicles with the spring you need to show caution to avoid injury. They make a special tool to compress the spring so it's no longer an issue.
Even if you only use the tool one-time it’s well worth the $10 price tag. The spring is surprisingly strong for its size.
Resist the temptation to pry it out of the way, because that's when people get hurt. It's also even harder to reinstall it than it is to get it out. If you're not willing to buy the $10 special tool I recommend that you do not tackle these repairs.
Installing the Door Hinge Repair Kit
You can find a lot of fantastic videos showing people installing the hinge repair kit on your specific model. You can watch a few of these videos and pick some of the best tricks and methods from each video.
With that said, I always start by spraying the area down with penetrating oil. After removing the lock ring with a pair of side cutters, the pins slide out easily once you get them to start moving with a few taps from a hammer and punch set up.
The bushings and pins often come out easily because the bushing is worn out and there's already a lot of play in this area. When it comes time to drive in the new bushings you want to do so delicately because the brass material is soft.
Often taking the time to find the right size tools to do the job pays the biggest benefits. An old 1/4 drive socket extensions come in handy, because of its availability in different lengths.
The tapered pin helps you align the door hinges during the installation process. When you're all finished with the GM door hinge repair you need to reinstall the new lock ring clips that come with the repair kit.
These retaining clips stop the pins from completely dropping out if something goes wrong with the door hinge. I've seen people skip this, because they don't go on easily.
You really need to install these lock clips. All you have to do is use a 3/8 inch deep socket mounted on an extension.
This size socket remains large enough for the pin to slide into yet small enough to contact the ring. If you’re interested in seeing a similar article about Ford trucks take a look through this article about Ford door latch problems.
You can also head over to the miscellaneous car problems page and look for additional auto repair articles that fall into the miscellaneous category.
Author bio : Mark is a retired ASE certified master technician, Chevrolet Professional Service Council member and the founder of FixMyOldRide.com. Watch the video on the about Mark the mechanic page to see his credentials. Mark hand writes all of the articles on FixMyOldRide.com unless indicated otherwise.