Intake Air Temperature Sensor Problems
Here we'll take a look at common intake air temperature sensor problems on vehicles from the mid-1990s through the 2000 decade of automobiles.
These are common malfunctions on General Motors products like Saturn, Chevrolet and Pontiac.
The good news is diagnosing and repairing intake air temperature sensor issues is fun compared to some of the other automotive computer and sensor failures you could have.
As an example, I just finished an article about fuel tank pressure sensor replacement on GM cars. This issue sends do-it-yourself mechanics on a mission to remove the gas tank from their old rides.
Thankfully IAT sensors remain in the top five of the easiest computer input sensors to replace on any automobile.
Quick Links: New Intake air temperature sensor for popular models.
With that said, although this sensor most often becomes the cause of a check engine light complaint, there's a possibility of a wiring problem.
Two wires feed the sensor a 5 V reference signal and ECM ground. Here we'll talk about diagnosing and testing intake air temperature sensor codes and some helpful tips on where to find parts and how to replace them without breaking the bank.
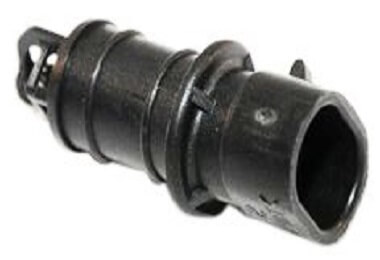
 Air Cleaner Temperature Sensor
Setting IAT Sensor Check Engine Light Codes
The P0113 on General Motors automobiles remains the most common check engine light code to set for a malfunctioning intake air temperature sensor. This often indicates a failed sensor.
When you look at these cheap plastic parts it's easy to see how they could fail over time. However, other check engine light codes set in memory.
However, when you find these different trouble codes in the computer's memory they actually point to a different type of failure. The P0110 stands for and IAT sensor circuit malfunction.
I've seen this code set when the sensing element backs out of the air stream. In addition, you could find a deteriorated or broken connector or possibly an intermittent or weak connection.
I've never run into a P0111 code. It stands for intake air temperature sensor circuit out of the performance range.
Wiring issues might cause this code to set. Every once in a while you run into a terminal that backed out of the connector. This type of electrical problem causes this code to set.
 Intake Air Temperature Sensor
We have two more codes that indicate an IAT circuit malfunction. The P0112 is for IAT sensor circuit low input. This signifies an issue with the 5 V reference sent from the vehicles power train control module out to the sensor.
Finally, we have the P0114. This stands for intake air temperature sensor circuit intermittent data returned. As mentioned above, this is also a possible indication of a poor connection. However, this code commonly sets on Chevrolet vehicles like the Camaro or even Saturn automobiles.
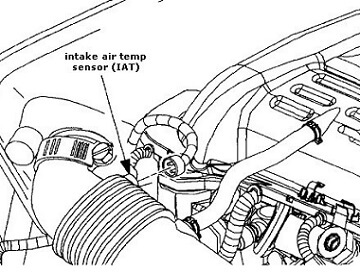
This is because the IAT sensor mounts in the air intake hose assembly on these models. The flexible mounting location allows for a lot of vibration during everyday driving situations. Over time the connector and terminals can get stretched and provide intermittent contact.
Common Intake Air Temperature Sensor Problem
As mentioned above, the most common code to set in the computer's memory for IAT sensor problems remains the P0113.
You often trace it back to an internal malfunction of the sensor itself. This small plastic sensor is a variable resistor that changes its value with temperature.
By the time these inexpensive, mostly plastic sensing devices hit the 20-year-old range they start to provide incorrect data to the vehicle's on board computer.
When the electronic control module realizes there's no way this data can be correct, it goes into a fixed value mode.
This causes the vehicle to run poorly, return awful fuel economy numbers and of course set the check engine light.
As you read through the pages on the fixmyoldride.com website you'll find I'm a big fan of properly diagnosing automotive problems before purchasing replacement parts.
However with an IAT sensor trouble code of P0113, I recommend replacing the part. If that doesn't fix it, then look for more difficult answers to the problem. First, the part is less than $20.
Second, I find in more than 75 percent of the automobiles I diagnose for this issue replacing the part fixes it.With that said, you should ignore me and do some basic tests before you order the replacement part.
There's no reason to get burned on this repair with an educated guess. We provide some additional instructions in the next section to help stop that from happening.
Identification and Location of the Air Temperature Sensor
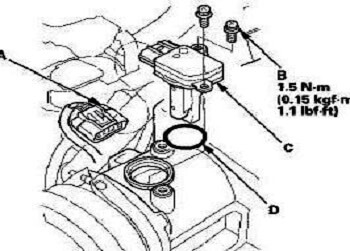
 Honda IAT Sensor Diagram
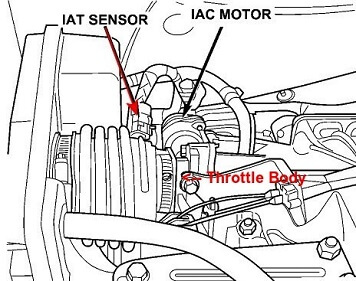
Before we continue some automotive manufacturers call the part an air cleaner temp sensor. On older vehicles, these parts mounted near the air filter. As time went on they moved the location to the air intake hose that runs between the air filter and the throttle body.
On the newer vehicles the IAT temperature sensor is even found mounted in the air plenum behind the throttle body. Why the change?
Vehicle manufacturers found that knowing the air temperature as it enters the combustion chamber becomes more important than knowing the temperature of the air outside of the vehicle.
Cars that use air plenum mounted parts often have a brass base. The ones that fit into the rubber air induction hose use all plastic components. When looking for these devices in the engine compartment you'll find most of them use two wire connectors.Nevertheless, on some Japanese automobiles like the Honda and Toyota products born in the 2000 decade, they can have three and even four wire connectors attached to the IAT sensor. I just finished an article about Honda VTec engine problems covering the the VTec solenoid and oil pressure switch.
Electrical Diagnosis for the Air Temperature Sensor
Using the simple two wire set up found on most General Motors automobiles diagnosis is straightforward. GM sends a 5 Volt reference signal and a ground signal from the computer.
With the part disconnected and the ignition key on, you should get a reading on your volt meter close to 5V.
When you reconnect the component you can back probe the reference signal and find a reading in the 4V range in cooler operating conditions.
As the automobile warms up or the air that is entering the intake system becomes warmer the voltage should decrease. For a quick and dirty test you can remove the sensor while it is back probed.
Use a hair dryer or a heat gun to run some warm air across the sensor
and watch the voltage decrease.You can go in the other direction and use ice to cool the sensor before you turn on the key.
An IAT part that doesn't react to the warm
air flowing across the sensor is a strong indication it has
failed. The variable resistor design should change the voltage value with even small changes in the temperature surrounding it.
If you're missing the ground or 5 v reference signal this could
indicate a computer problem. With that said, wiring issues also remain a strong
possibility in this situation. In fact, I'll say computer failures seem rare when it comes to problems with the intake air temperature system.
Performance Tuning with the Air Temperature Sensor
 Saturn IAT Sensor Location Diagram
Engine performance designers use the input data from the IAT sensor to fine tune the air fuel mixture.
People looking to squeeze more performance out of their automobiles see this as an interesting opportunity for some modification.
Race fans use fixed value temperature sensors with modified harnesses to try to squeeze a little more performance of their old ride.
However, I'm not a fan of this modification, because you sacrifice fuel economy and the vehicle often fails state emissions testing. If you own a Chevrolet truck learn about the GM intake manifold problem before replacing your air temperature sensor.
Author bio : Mark is a retired ASE certified master technician, Chevrolet Professional Service Council member and the founder of FixMyOldRide.com. Watch the video on the about Mark the mechanic page to see his credentials. Mark hand writes all of the articles on FixMyOldRide.com unless indicated otherwise.