Chevy V8 Intake Manifold
You must remove a Chevrolet intake manifold to repair some common problems on trucks with V8 engines.
This includes the slow and
mysterious disappearance of engine coolant on the 5.7L Chevy. The 5.7 Liter has coolant passages running through the intake. Knock sensors remain a problem on other displacements.
You'll find these issues on
generation two and generation three Chevrolet engines from the
mid-1990s through the 2007 model year. Note: They stopped putting the
5.7L in Chevy trucks in 1999.
Although these are the two most common reasons to remove either the upper plenum or lower portions of the intake manifold on the 350 cubic inch, these are not the only ones.
Quick Links : New Manifold Gasket kit with valve cover seals. Compatible with Chevrolet and GMC 4.8L 5.3L 6.0L.
New Manifold Gasket kit with Knock sensors and wiring harness included. Fits Chevrolet Silverado and GMC Sierra.
Not surprising, that anytime you remove a cylinder head or perform any kind of major engine work you'll need to remove the intake manifold.
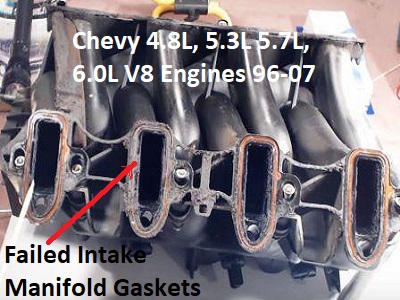
What is surprising, is when you see the gasket that General Motors used during assembly. From the factory Chevrolet used a composite intake manifold gasket made of plastic and silicone.
Since the gasket is delicate and will crack from over tightening, General Motors uses a very light torque spec measured in inch pounds.
Therefore, they installed thread locking compound on the manifold bolts to stop them from backing out.
This becomes an important point to make before moving our way down to the repair section below. What I want people to understand from this article is that improved gaskets are now available.
In addition, you want to get new bolts unless you have a bench grinder with a wire wheel. A new bolt kit might seem an unimportant suggestion.
However, reusing the old bolts without cleaning and reapplying thread locking compound becomes the number one reason for repeat failure of the intake manifold gaskets replacement operation.
 Bad Chevy Intake Manifold Gaskets
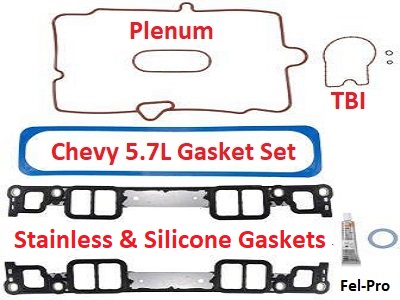
You can get rid of the plastic and silicone gaskets and go with a steel and rubber assembly from Fel-Pro and other suppliers. They call these premium gaskets.
It's not often I recommend an aftermarket parts solution. I'm a strong believer in AC Delco and General Motors replacement parts.
With that said, whenever I have a chance to replace something plastic with parts made out of metal, I do it.
The other important point to make is the replacement of the knock sensors and wiring harnesses while you have the intake manifold removed. The common code theses engine set for a knock sensor malfunction is P0332.
The part of this that amazes me is the amount of vehicles that experience this problem or will in the future.
They make an inexpensive kit that includes the wiring harness and both sensors for $25. The one on the left fits 4.8L and 5.3L 2001 through 2007.
The poor design of the knock sensors on these Chevrolet engines cause check engine light codes to set as the plastic connectors disintegrate from heat and age.
Avoid pulling the intake off again. Take care of it now. In addition, water gets down around the knock sensors and causes corrosion issues.
This leads me into the next section where we'll talk about the symptoms associated with these common problems and the engines most affected.
Symptoms of an Intake Manifold Problem
Before we talk about the symptoms of the intake Manifold problem let's talk about the massive amount of vehicles affected by this issue.
The plastic and silicone gaskets installed from the factory found their way into generation two and generation three V-8 engines. This includes the popular 5.7 L Vortec V8 and the series of V-8 engines that replaced the legendary small block Chevy.
The generation three engines included the displacement variety of 4.8 L, 5.3 L, 6.0 L and even the mighty 8.1 L V-8 truck engine. Note: I put the Vortec V6 problem on a separate page. The generation three engines leak vacuum or set other codes for misfire or lean exhaust issues.
The symptoms of this intake manifold problem on the 5.7L usually begin with a low coolant light. Coolant runs through the intake on the 350 cubic inch engine.
In the beginning a simple topping off of the coolant reservoir takes care of the issue for weeks or even months. However, as the leak picks up speed drivers realize they have a problem that needs resolving.
Unfortunately, when they go to search down the engine coolant leak, they usually find no signs of such a leak. This is because the intake manifold gasket is allowing coolant to slip past and down into the crankcase.
These small droplets will not harm the engine at first. In fact, sometimes the leak is so slow, the water boils off, leaving no signs of a problem. If drivers ignore the low coolant level they'll often hear gurgling in the heater system.
This becomes a sign of air pockets in the system. My mom's Chevrolet Cruze developed a coolant leak from the thermostat housing, but she didn't tell me until she had no heat.
A special note about cracked plastic Chevrolet intake manifolds. In most cases we find gasket failure, but on rare occasions you might see a cracked intake.
Therefore, the symptoms between the two situations become different. With a cracked manifold you see white smoke from the tailpipe and the engine runs rough. These often crack on the inside making it hard to see.
Finally, the last symptom to discuss requiring the removal of the intake manifold is the knock sensor problem. The check engine light comes on and usually sets a code P0327.
Long story short, General Motors installed plastic connectors that don't hold up over time. As the connector weakens so does the connection and an intermittent signal to the PCM triggers the P0327 trouble code.
Chevrolet Intake Manifold Parts
 Chevrolet Intake Manifold Gasket Set
The last thing I want to do is buy another plastic composite gasket.
These gaskets get sandwiched between two major engine parts. At first Delco was the only game in town, but now Fel-Pro stepped up and provides better parts.
I don't usually go throwing around the word better on the FixMyOldRide.com website, but to me, that's what they are. Fel-Pro replaced the plastic with a stainless steel all metal gasket using heavy-duty rubber inserts.
The part alone reduces the chances of repeat failures because of its construction. This is fantastic news for people who try to perform this repair without an inch pound torque wrench.
On the old plastic gaskets if you over tighten the intake manifold bolts you will crack the new gasket and it will leak badly. This leads me into the next section where we'll discuss the intake manifold bolts themselves.
When you remove the factory installed bolts you find that the threads have a liberal amount of thread locking compound on them. You can reuse these bolts, but you must clean all of the old glue off and then reinstall fresh thread locking compound.
In some cases people take a shortcut and skip these steps. The old glue stops you from smoothly torquing the intake manifold bolts on reassembly.
The torque specification is critical in this operation. The tightening pattern and torque specification are in the repair section below. The bolts have a tendency to back out if you don't install fresh thread locking compound.
For this reason I now include the replacement bolts in the estimate. This means I don't have to wire wheel, eight individual bolts and then apply messy thread locker.
I'm not saying that you have to do this, but if you don't you leave the opportunity open of a repeat failure. The next thing to talk about is the knock sensors and the wiring harness replacement parts.
This is a tough one because the AC Delco knock sensor parts are about $45 apiece. The wiring harness goes for about another $25. Aftermarket companies have bundled these components together that carry a very attractive price tag.
Chevrolet Intake Manifold Repair Procedure
Since I mentioned the torque of the intake manifold bolts several times in this article already, let's tackle this issue first. The tightening pattern is a typical spread pattern that starts in the center and works its way out by alternating sides.
You can see a video of how it's done on YouTube. With that said, the important part of the procedure is to torque the bolts to 44 inch pounds on the first pass and then 89 inch pounds on the second pass.
This is time-consuming and people often look to take a shortcut. The Second cause of having to pull the Chevrolet V8 intake manifold again is failure to use a thread locking compound during the installation.
People don't often realize, when you install a thread locker, it provides a smooth even torque lubricant. The compound only locks the bolt in place when it’s fully dry in about an hour or two.
You
can find an inch pound torque wrench for 25 bucks at the freight place
or borrow one from the local parts store. Don’t try to guess what 89
inch pounds feel like. I’ve been doing this 30 years and I can’t do it
without the tool.
We filed this Chevrolet V8 intake manifold article in the maintenance and tune-up section.
If you own one of these Chevrolet trucks we have additional diagnostic
and repair procedures you're sure to find helpful. Take a look at the Chevrolet truck ignition switch issue and then have a look at the oil pressure switch story. Finally, learn about the plastic Vortec V8 engine distributor problem.
Author bio : Mark is a retired ASE certified master technician, Chevrolet Professional Service Council member and the founder of FixMyOldRide.com. Watch the video on the about Mark the mechanic page to see his credentials. Mark hand writes all of the articles on FixMyOldRide.com unless indicated otherwise.